Like List
Overview
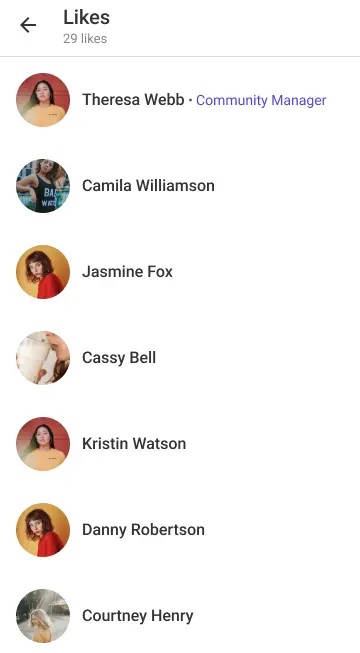
The LMFeedLikeListScreen is designed to present a list of users who have liked a specific post/comment. It displays the user images along with their names and a custom title (if available), and provides a count of the total number of likes for the post.
GitHub files:
UI Components
Props
onTapUserItemProp: Triggered when a user item is tapped. Provides theLMUserUIobject of the tapped user.handleScreenBackPressProp: Triggered when the back button is pressed on the screen.
Styling Customisation
The STYLES class allows you to customize the appearance of the LMPostContent. You can set the styles in postLikesListStyle in STYLES.
| Property | Type | Description |
|---|---|---|
screenHeader | LMHeaderProps | The header component for the screen. |
likeListItemStyle | ViewStyle | Style for each like list item. |
userNameTextStyle | TextStyle | Style for the user's name text. |
userDesignationTextStyle | TextStyle | Style for the user's designation text. |
For member's profile picture, the customisation is done using profilePicture in header of postListStyle
Usage Example
Step 1: Create Custom Screen
- Create a
CustomLikesScreenfile that defines the post likes screen and sets up styles and interaction callbacks as per requirement.
import {
  PostLikesList,
  usePostLikesListContext,
} from "@likeminds.community/feed-rn-core";

const CustomLikesScreen = ({ route }) => {
  const { navigation, handleScreenBackPress } = usePostLikesListContext();

  // customised handleScreenBackPress callback
  const customBackHandler = () => {
    console.log("do something before back click");
    handleScreenBackPress();
    console.log("do something after back click");
  };

  const postLikesListStyles = {
    userNameTextStyle: {
      color: "green",
    },
    userDesignationTextStyle: {
      color: "red",
    },
  };

  // like list screen customisation
  if (postLikesListStyles) {
    STYLES.setPostLikesListStyles(postLikesListStyles);
  }
  return (
    <PostLikesList
      route={route}
      navigation={navigation}
      handleScreenBackPressProp={() => customBackHandler()}
    />
  );
};

export default CustomLikesScreen;
Step 2: Wrap the Screen with Context Provider
- Create a
LikesScreenWrapperthat wraps the screen withPostLikesListContextProvider.
import { PostLikesListContextProvider } from "@likeminds.community/feed-rn-core";
import CustomLikesScreen from "<<path_to_CustomLikesScreen.tsx>>";

const LikesScreenWrapper = ({ navigation, route }) => {
  return (
    <PostLikesListContextProvider navigation={navigation} route={route}>
      <CustomLikesScreen route={route} />
    </PostLikesListContextProvider>
  );
};

export default LikesScreenWrapper;
Step 3: Add the Custom Screen in App.tsx
- In your
App.tsx, create aStack.Navigatorin theNavigationContainerwrapped byLMOverlayProvider. - Add
LikesScreenWrapperas a Stack screen in yourNavigationContainer.
import {
  POST_LIKES_LIST,
  LMOverlayProvider,
  STYLES,
} from "@likeminds.community/feed-rn-core";
import LikesScreenWrapper from "<<path_to_LikesScreenWrapper.tsx>>";
import { NavigationContainer } from "@react-navigation/native";
import { createNativeStackNavigator } from "@react-navigation/native-stack";

export const App = () => {
  const Stack = createNativeStackNavigator();
  return (
    <LMOverlayProvider
      myClient={myClient} // pass in the LMFeedClient created
      apiKey={apiKey} // pass in the API Key generated
      userName={userName} // pass in the logged-in user's name
      userUniqueId={userUniqueID} // pass in the logged-in user's uuid
    >
      <NavigationContainer ref={navigationRef} independent={true}>
        <Stack.Navigator screenOptions={{ headerShown: false }}>
          <Stack.Screen name={POST_LIKES_LIST} component={LikesScreenWrapper} />
        </Stack.Navigator>
      </NavigationContainer>
    </LMOverlayProvider>
  );
};