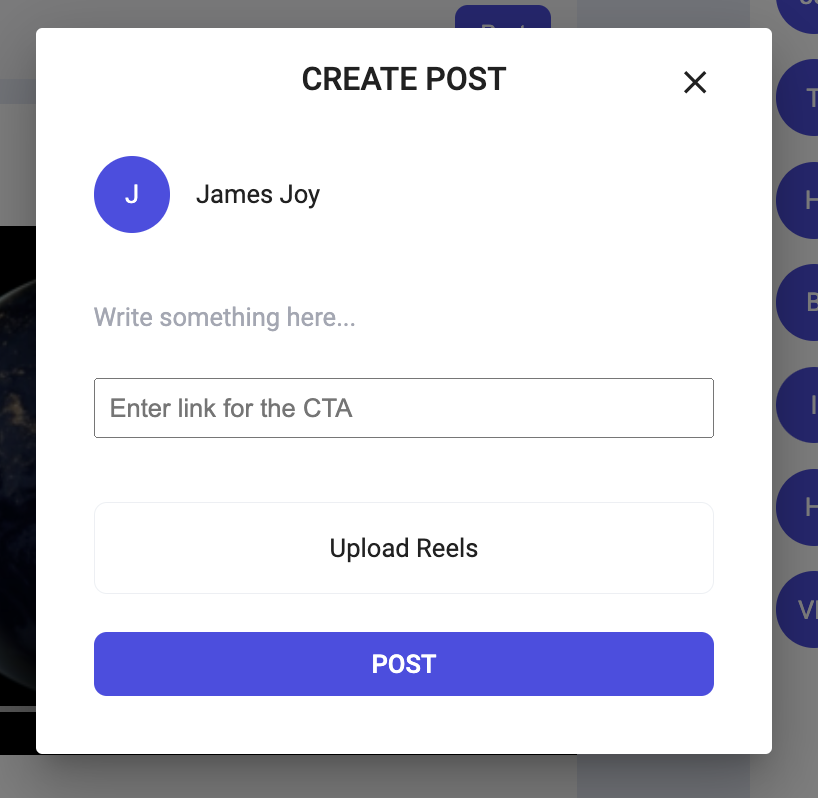
Example implementation in video feed
In this tutorial we will add a custom input box in the post creation dialog and render the reel with a custom CTA in the feed.
While we will create a new component, for the ease of implementation we will still use the classnames used in the default components provided by the SDK.
Creating a custom post creation dialog
The custom post creation dialog will allow users to add an input field. Developers will be able to send additional JSON data with the post.
Step 1 - Create Custom Post Creation Dialog View Component
To display the above layout, create two new component CustomLMFeedCreatePostDialog & CustomCreatePostAttachmentController in the same file you created above.
- TSX
import { useContext } from "react";

import { Divider } from "@mui/material";
import CloseIcon from "@mui/icons-material/Close";
import {
  CustomAgentProviderContext,
  LMFeedCreateMediaPost,
  LMFeedCreatePostContext,
  LMFeedCreatePostMediaUploadMode,
  LMFeedCreatePostSubmitButton,
  LMFeedMediaUpload,
  LMFeedTextArea,
  LMFeedUserProviderContext,
  LMFeedViewTopicDropdown,
  LMTopicsDropdownMode,
  LMFeedCreateEditPostMediaRenderer,
} from "@likeminds.community/likeminds-feed-reactjs";

interface LMFeedCreatePostDialogProps {
  mediaUploadDialog?: string;
}

const CustomLMFeedCreatePostDialog = ({}: LMFeedCreatePostDialogProps) => {
  const { currentUser } = useContext(LMFeedUserProviderContext);
  const {
    mediaUploadMode,
    setSelectedTopicIds,
    selectedTopicIds,
    preSelectedTopics,
    setPreSelectedTopics,
    temporaryPost,
    setOpenCreatePostDialog,
    createPostComponentClickCustomCallback,
    mediaList,
  } = useContext(LMFeedCreatePostContext);
  const { CustomComponents = {} } = useContext(CustomAgentProviderContext);
  const { CustomTopicDropDown } = CustomComponents;

  return (
    <div
      className="lm-feed-create-post-wrapper"
      onClick={(e) => {
        if (createPostComponentClickCustomCallback) {
          createPostComponentClickCustomCallback(e);
        }
      }}
    >
      <div className="lm-feed-create-post-wrapper__dialog-heading">
        {temporaryPost ? "EDIT POST" : "CREATE POST"}
        <span
          onClick={() => {
            if (setOpenCreatePostDialog) {
              setOpenCreatePostDialog(false);
            }
          }}
          className="cancelIcon"
        >
          <CloseIcon />
        </span>
      </div>
      <div className="lm-feed-create-post-wrapper__user-meta">
        <div className="lm-avatar lm-mr-4">
          {getAvatar(currentUser?.imageUrl || null, currentUser?.name || "")}
        </div>
        <div>{currentUser?.name}</div>
      </div>
      {CustomTopicDropDown || (
        <LMFeedViewTopicDropdown
          mode={
            temporaryPost
              ? LMTopicsDropdownMode.edit
              : LMTopicsDropdownMode.modify
          }
          setSelectedTopicsIds={setSelectedTopicIds}
          selectedTopicIds={selectedTopicIds}
          preSelectedTopics={preSelectedTopics}
          setPreSelectedTopics={setPreSelectedTopics}
        />
      )}
      <Divider
        sx={{
          borderColor: "#FFF",
        }}
        className="lm-feed-create-post-topic-text-area-divider"
      />
      <div className="lm-textarea">
        {CustomComponents.CustomCreatePostTextArea || <LMFeedTextArea />}
      </div>

      <input
        type="text"
        id="cta-link-input"
        className="custom-cta-link-input"
        placeholder="Enter link for the CTA"
      />
      <LMFeedCreateEditPostMediaRenderer />
      {mediaUploadMode !== LMFeedCreatePostMediaUploadMode.NULL &&
      !temporaryPost &&
      !mediaList?.length ? (
        <LMFeedMediaUpload />
      ) : null}
      {!temporaryPost && <CustomCreatePostAttachmentController />}

      <LMFeedCreatePostSubmitButton />
    </div>
  );
};

export default CustomLMFeedCreatePostDialog;

export function CustomCreatePostAttachmentController() {
  const { changeMediaUploadMode } = useContext(LMFeedCreatePostContext);

  return (
    <div
      className="lm-feed-create-post-wrapper__attachments-controller"
      lm-feed-component-id={`lm-feed-create-post-attachments-controller-zabcd`}
    >
      <span
        className="lm-create-dialog-video-icon-container pointer"
        onClick={() => {
          if (changeMediaUploadMode)
            changeMediaUploadMode(LMFeedCreatePostMediaUploadMode.REEL);
        }}
        style={{
          margin: "auto",
        }}
      >
        Upload Reels
      </span>
    </div>
  );
}
Once you are done with creating your component, pass this component inside the LMFeed as a prop.
// Import the component you just created.
import {
  CustomLMFeedCreatePostDialog,
  CustomCreatePostInitiateView,
} from "./CustomCreatePostComponent";
<LMFeed
  // All other previous props
  CustomComponents={{
    CustomCreatePostInitiateView: CustomCreatePostInitiateView,
    CustomCreatePostDialog: <CustomLMFeedCreatePostDialog />,
  }}
></LMFeed>;
Now you need to define a custom function to fetch the value in the additional input field you've just created. You can do so by using the browser's getElementByID API. After creating the function just pass it to the LMFeed
// Other SDK Components
<LMFeed
  // Other SDK props
  PostCreationCustomCallbacks={{
    postFeedCustomAction: async (store) => {
      const {
        defaultActions: { postFeed },
      } = store;
      // This will give you an instance of the new text field we've added.
      const ctaInputField: HTMLInputElement = document.getElementById(
        "cta-link-input"
      ) as HTMLInputElement;
      postFeed([
        {
          cta: ctaInputField.value,
        },
      ]);
    },
  }}
></LMFeed>
Step 2 - Render Reels with the custom CTA
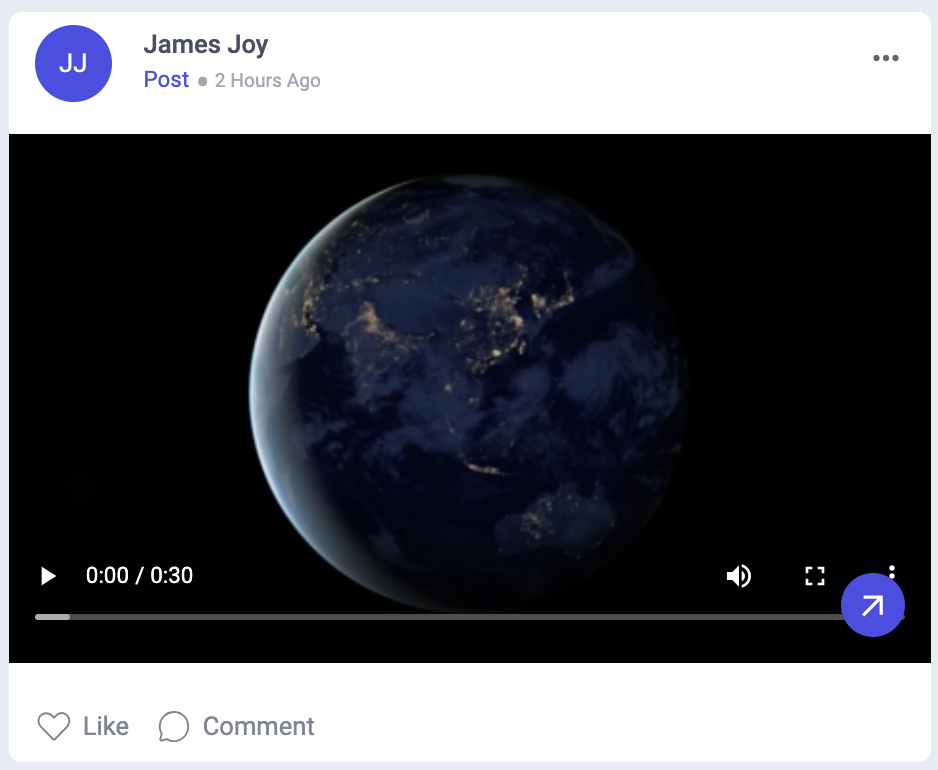
Now we will create a custom component like the above shown, for LMFeedPostBody, with your CTA inside it.
Create a new file by the name CustomPostBody.tsx and create two components CustomLMFeedPostBody & CustomCTAActionButton.
- TSX
- CSS
import {
  CustomAgentProviderContext,
  FeedPostContext,
  LMFeedAttachments,
} from "@likeminds.community/likeminds-feed-reactjs";
import ArrowOutwardIcon from "@mui/icons-material/ArrowOutward";
import { useCallback, useContext, useMemo } from "react";

const CustomLMFeedPostBody = () => {
  const { post, widgets } = useContext(FeedPostContext);
  const { text, attachments, heading } = post!;
  const { CustomComponents = {} } = useContext(CustomAgentProviderContext);
  const { CustomPostViewAttachment } = CustomComponents;
  const customWidgetMetadata = useMemo(() => {
    const customWidgetIndex = attachments?.findIndex(
      (attachment) => attachment.attachmentType === 5
    );

    if (customWidgetIndex !== -1 && widgets) {
      const customWidgetAttachment = attachments[customWidgetIndex];
      const customWidgetEntityID =
        customWidgetAttachment.attachmentMeta.entityId || "";
      const customWidgetObject = widgets[customWidgetEntityID];
      const customWidgetMetadata = customWidgetObject.metadata;
      return customWidgetMetadata;
    } else {
      return null;
    }
  }, []);
  // Render attachments
  const renderAttachments = useCallback(() => {
    if (!attachments || attachments.length === 0) return null;

    return (
      <div
        className="attachments"
        lm-feed-component-id={`lm-feed-post-body-dn2pl-${post?.Id}`}
      >
        <LMFeedAttachments
          postId={post?.Id || ""}
          attachments={attachments.filter(
            (attachment) => attachment.attachmentType !== 5
          )}
        />
      </div>
    );
  }, [CustomPostViewAttachment, attachments, post?.Id]);

  return (
    <div
      className="lm-feed-wrapper__card__body relative"
      lm-feed-component-id={`lm-feed-post-body-vwxyz-${post?.Id}`}
    >
      {heading.length > 0 && (
        <h1
          className="lm-feed-wrapper__card__body__heading"
          style={{
            cursor: !window.location.pathname.includes("/post")
              ? "pointer"
              : undefined,
          }}
          lm-feed-component-id={`lm-feed-post-body-abcde-${post?.Id}`}
        >
          {heading}
        </h1>
      )}
      {/* post text */}
      {text ? (
        <div
          className="lm-feed-wrapper__card__body__content"
          lm-feed-component-id={`lm-feed-post-body-fghij-${post?.Id}`}
        >
          {text}
        </div>
      ) : null}
      {/* post text */}
      <div
        className="lm-feed-wrapper__card__body__attachment"
        lm-feed-component-id={`lm-feed-post-body-pqrst-${post?.Id}`}
      >
        {renderAttachments()}
      </div>
      {customWidgetMetadata && (
        <CustomCTAActionButton metadata={customWidgetMetadata} />
      )}
    </div>
  );
};

interface CustomCTAActionButtonProps {
  metadata: any;
}
export const CustomCTAActionButton = ({
  metadata,
}: CustomCTAActionButtonProps) => {
  const link = metadata.meta.cta || "";
  return (
    <a href={link} className="custom-cta-action">
      <ArrowOutwardIcon
        style={{
          color: "white",
        }}
      />
    </a>
  );
};

export default CustomLMFeedPostBody;
/* CustomBodyCSS.css  */

.stock-chart > img {
  max-width: 100%;
}

.action-center {
  display: flex;
  justify-content: flex-start;
  gap: 8px;
  margin-top: 8px;
}

.action {
  padding: 16px;
  border: none;
  font-size: 16px;
  color: white;
  width: -webkit-fill-available;
}

.buy {
  background-color: #4184f3;
}

.sell {
  background-color: #df514c;
}
Once you are done with creating your component, you just have to pass this component inside the LMFeed as a prop.
// Import the component you just created.
import CustomLMFeedPostBody from "./CustomPostBody";
<LMFeed
  // All other previous props
  CustomComponents={{
    CustomPostViewBody: <CustomLMFeedPostBody />,
  }}
></LMFeed>;
Step 3 - Run your project
To start your project run the command npm run dev or npm start in your terminal.